
A leave management system should be simple with easy steps for applying for leaves as it would be used by every employee in the company. With Pocket HRMS, the employees can easily apply for leave for future dates directly from their smartphones using the Pocket HRMS mobile app.
In this article, we will discuss the leave application system of the Pocket HRMS mobile app.
To apply for a leave, the user must navigate to the ‘Leave Request’ page. Below, we have provided the navigation steps for your reference:
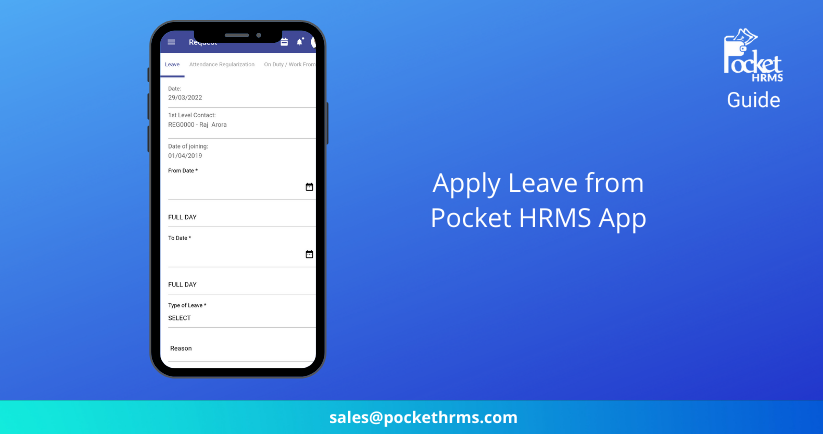
You need to fill the following fields to successfully apply for a leave:
This field is pre-filled with the date on which the leave is being applied and hence, is non-editable.
This field is pre-filled with the manager’s name who is authorized to review and accept or reject the employee’s leave application.
This field indicates the joining date of the employee who is applying for the leave.
This is a mandatory field and by tapping on it, a ‘Date picker’ will pop up. The employee is required to select the starting date of the leave.
Note: A day is divided into three categories: FULL DAY, FIRST HALF DAY and SECOND HALF DAY. Employees have the liberty to choose any type according to their convenience.
This is a mandatory field and by tapping on it, a ‘Date picker’ will pop up. The employee is required to select the end date of the leave.
Note: The former classification of FULL DAY, FIRST HALF DAY and SECOND HALF DAY apply here too and employees have the liberty to choose any type as per their convenience.
This is a mandatory drop-down field where employees will get a list of the different leave types defined by HR.
Note: Each leave type has its own allocated number of days. By selecting a specific leave type, the employee will get to know the remaining number of leave days they have for the selected leave type.
In this field, the employee can define the reason for the holiday in detail. It is not mandatory to define the reason.
Using this field, the employee can select whether they are leaving their city for the holiday. They can select either ‘Yes’ or ‘No’ from the dropdown.
The employee can inform where they are going by providing the vacation address in this field. It is not a mandatory field.
This is an optional field where the employee can provide a new contact number in case their usual number is unreachable at the vacation address.

Once you have filled in all the fields discussed above, you can tap on the ‘Save’ button to apply for the leave.
As we can understand, the leave application process of the Pocket HRMS mobile app takes only a few seconds and it can be performed remotely by the employee. This makes the entire process easy and convenient for both the manager approving the leave request and the employee applying for the leave.
For viewing more step-by-step guides on Pocket HRMS, click here.